![]()
By Bill Lamkin
Most Windows applications allow users to resize their main client window. To do so, users simply press the mouse button with the cursor over the window's border, then stretch the border to the new size. These applications allow users to set practically any size they want for the client window.
In some cases, Windows applications shouldn't allow users to resize the client window. For example, none of the common dialog boxes allow users to resize their client window. Their client window simply doesn't supply the wide sizable border of a normal window.
You may think you have only two alternatives: allowing users to specify any size window or not allowing users to change the window size at all. Fortunately, there's a third option.
In this article, we'll show you how to let users resize
your application's client window but limit how much they
can stretch or shrink the window. To do so, we'll discuss
the special WM_GETMINMAXINFO Windows message and its
related GETMINMAXINFO structure. Then we'll show
you how to respond to this message by using the ObjectWindows
2.0 Message Response Tables.
If you write an application you don't want users to resize, you should specify nonsizable borders. One application that does so is the well-known Windows Calculator application. Figure A shows Calculator, which is found in the Windows Accessories group.

Figure A - You can't modify Calculator's client window size.
As you can see, the Calculator application doesn't allow users to modify its client window size. Because you can't resize its window, the Calculator application's controls will always be visible.
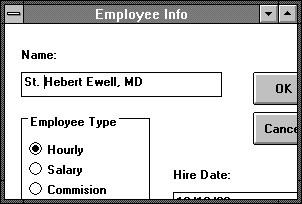
Without this limitation, users may become confused when they can't access important client window information. Figure B shows an Employee application in which a user has resized the client window over some push buttons and edit controls.

Figure B - The Employee application isn't malfunctioning-a user has resized its main client window over some important controls.
Instead of prohibiting all window resizing, you may choose to
write your application so it allows limited resizing. In fact,
your application can specify minimum and maximum window sizes,
and Windows will handle the details for you.
When a user clicks the left mouse button on a nonclient area of an application, Windows sends the application a WM_NCHITTEST message. Along with this message, Windows sets the wParam variable equal to a constant your application can use to determine exactly which part of the nonclient area the mouse pointer is on.
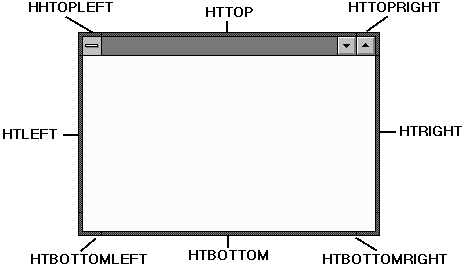
Users can select several different nonclient areas of an application's main window to resize windows. We've marked these nonclient areas by name in the window shown in Figure C.

Figure C - These are the nonclient areas and their corresponding captions.
If your application lets the DefWndProc() function handle
the WM_NCHITTEST message, and that function determines
the mouse pointer is in one of the sizing areas we show in Figure
C, Windows sends the application a special message:
WM_GETMINMAXINFO
When Windows sends this message, it's asking the application for the smallest and largest window sizes to which it should let the user stretch the client window. Since most applications don't handle this message, Windows typically lets users resize client windows to any size they like.
If you want your application to limit the size users can specify
for your client window, all your application has to do is tell
Windows exactly how big or small it can let the client window
become. So how do applications specify their minimum and maximum
sizes? They do so by filling out a MINMAXINFO structure.
When Windows sends your application a WM_GETMINMAXINFO message, it also passes along the address of a special structure in the lParam parameter. That structure is called a MINMAXINFO structure. Figure D contains the MINMAXINFO structure definition.
![]()
Figure D - This is the MINMAXINFO structure and its related POINT structure.
/* Struct pointed to by WM_GETMINMAXINFO lParam */
typedef struct tagMINMAXINFO
{
    POINT ptReserved;
    POINT ptMaxSize;
    POINT ptMaxPosition;
    POINT ptMinTrackSize;
    POINT ptMaxTrackSize;
} MINMAXINFO;

typedef struct tagPOINT
{
    int x;
    int y;
} POINT;
![]()
As you can see, the MINMAXINFO structure holds several POINT structures. Of interest to us are ptMinTrackSize and ptMaxTrackSize.
If your application needs to limit how small a user can size its
client window, it should set the x and y members
of the ptMinTrackSize member. Similarly, if your application
needs to limit how large a user can size its client window, it
should set the x and y members of the ptMaxTrackSize
member structure.
For example, in a typical window procedure that responds to the
WM_GETMINMAXINFO message, you would declare a pointer
to a MINMAXINFO structure with something similar to
MINMAXINFO FAR *lpMinMaxInfo;
Then, inside a switch statement for different message types, you'd set the minimum tracking size by writing
case WM_GETMINMAXINFO:

  // set the MINMAXINFO structure pointer
  lpMinMaxInfo = (MINMAXINFO FAR *) lParam;
  lpMinMaxInfo->ptMinTrackSize.x = 100;
  lpMinMaxInfo->ptMinTrackSize.y = 100;
  break;
Now, let's create an application that responds to this
message by using the OWL message-response strategy.
Listing A: LIMITS.CPP
#include <owl\applicat.h>
#include <owl\checkbox.h>
#include <owl\dc.h>
#include <owl\framewin.h>
#include <owl\owlpch.h>
#include <owl\eventhan.h>

class TLimitsApp : public TApplication
{
  public:
   TLimitsApp(){}
   ~TLimitsApp() {};

   void
   InitMainWindow()
   { SetMainWindow(new TFrameWindow( 0, "Limits"));
   }

   void
   EvGetMinMaxInfo(MINMAXINFO far & minMaxStruct)
   {
     minMaxStruct.ptMinTrackSize.x =
       100 + (GetSystemMetrics(SM_CXFRAME) * 2);

     minMaxStruct.ptMinTrackSize.y =
       100 + (GetSystemMetrics(SM_CYFRAME) * 2) +
       GetSystemMetrics(SM_CYCAPTION) +
       GetSystemMetrics(SM_CYMENU);

     minMaxStruct.ptMaxTrackSize.x = 300;
     minMaxStruct.ptMaxTrackSize.y = 300;
   }
  DECLARE_RESPONSE_TABLE(TLimitsApp);
};

DEFINE_RESPONSE_TABLE1(TLimitsApp,TApplication)
  EV_WM_GETMINMAXINFO,
END_RESPONSE_TABLE;

int
OwlMain(int /*argc*/, char* /*argv*/ [])
{
  return TLimitsApp ().Run();
}
![]()
If you look closely, you'll notice that we set the data in the MINMAXINFO structure inside the EvGetMinMaxInfo() member function. By including this function in the application class, adding the DECLARE_RESPONSE_TABLE macro to the application class, and then placing the EV_WM_GETMINMAXINFO macro in the response table definition macros, we cause OWL to call the EvGetMinMaxInfo() function whenever it receives a WM_GETMINMAXINFO message from Windows. (If you want to know more about responding to a Windows message with OWL 2.0, see "Responding to Standard Messages with ObjectWindows 2.0," in the March 1994 issue of Borland C++ Developer's Journal.
Notice that the EvGetMinMaxInfo() function includes the size of the borders, caption, and menu bar when it calculates the minimum size for the window. This ensures that the user won't be able to reduce the window to an unusable size.
When you've finished entering the code for LIMITS.CPP, choose Save from the File menu. Next, open the project's Module Definition file by double-clicking on limits [.def] in the Project window. When the editor window appears, enter the code from Listing B. When you finish entering the data in LIMITS.DEF, choose Save from the File menu.
![]()
Listing B: LIMITS.DEF
NAME          LIMITS
DESCRIPTION   'Limit Windows Application'
EXETYPE       WINDOWS
CODE          PRELOAD MOVEABLE
DATA          PRELOAD MOVEABLE MULTIPLE
HEAPSIZE      1024
STACKSIZE     5120
![]()
Finally, remove the limits [.rc] file from the project
window. To do this, click on its name with the right mouse button
and choose Delete Node from the pop-up menu.
To compile and run LIMITS.EXE, double-click on limits [.exe] in the Project window. When the IDE finishes compiling and linking the program, the program's main window will appear.
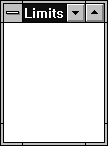
To adjust the window to its minimum size, position the mouse pointer
over the lower-right corner of the window's border, press
the left mouse button, and drag the corner of the window up and
to the left as far as it will go. When you release the mouse button,
the window should resemble the one shown in Figure F.

Figure F - You can't make the LIMITS.EXE main window client area smaller than 100 pixels tall and 100 pixels wide.
Now, adjust the window to its maximum size by positioning the
mouse pointer over the lower-right corner of the window's
border, pressing the left mouse button, and dragging the corner
of the window as far as possible down and to the right. When you
release the mouse button this time, the window will be at its
maximum size, as shown in Figure G.

Figure G - You can't make the LIMITS.EXE main window larger than 300
pixels tall and 300 pixels wide.
To close the LIMITS.EXE application, double-click on its System
menu icon. To close the IDE, choose Exit from the File menu.