![]()
With the current trend toward user-friendly software, many programmers are trying to design their applications to prevent the user from performing operations that aren't appropriate for the current context. For menu commands, this means graying the corresponding menu item when the command shouldn't be available, then changing the item back to normal when the command should be available.
Unfortunately, enabling and disabling commands this way is confusing
and error-prone because the code that enables and disables the
commands may appear in many places throughout your application.
In this article, we'll show you how to implement the command-enabling
strategy that Borland added to the ObjectWindows Library (OWL)
for version 2.0. As a result, you'll be able to provide
an easy-to-use interface with your Windows applications.
In a pre-OWL 2.0 application, enabling and disabling menus wasn't hard (a simple call to the EnableMenuItem() Windows function), but coordinating the enabling/disabling process was. Basically, you had to monitor the status of the application and then call the EnableMenuItem() function when the context changed (i.e., when the user opened or closed a window).
In a simple application, you could just tie the enabling/disabling code to the commands that create the valid/invalid conditions. Figure A shows how you might enable and disable menu commands from the message-handling section of a traditional Windows program's window procedure.
![]()
switch(msg)
{
  case WM_COMMAND:    // Menu command
    switch(wParam)
    {
      case IDM_OPEN:  // Open selected
        // actions for the Open menu item.

        // Call EnableMenuItem() somewhere
        // to enable the Close menu item.
      break;

      case IDM_CLOSE: // Close selected
        // actions for the Close menu item.

        // Call EnableMenuItem() somewhere
        // to disable the Close menu item
        // if this command closes the last
        // open file.
      break;
    }
    break;

  // Other message handling
}
![]()
Unfortunately for you, the programmer, the user can choose to display a menu at any time. If your code doesn't change the menus at the correct time, the user may occasionally see a menu command that isn't appropriate. In addition, you may not have written the application to handle the user issuing a command from an inappropriate location.
If you move all the enabling/disabling code for a command to a separate function, the code becomes easier to maintain. However, you still have to call that function at the right time to prevent a confusing and possibly disastrous situation for the user.
In OWL 2.0, enabling and disabling menu commands is much easier to understand and use. To provide menu-command enabling and disabling, you'll need to do two things: Create a command-enabler function in the appropriate event-handling class and put that function in the class's event response table.
The command-enabler function is similar to a message-response function you write to make your OWL application respond to a standard Windows message. This is because command-enabler functions must have a specific function signature (parameters and return type) just as message-response functions do. A command-enabler function must accept a TCommandEnabler object reference as its only parameter and return void.
Inside its body, a command-enabler function needs to analyze the state of the application and decide if the command is valid or invalid for the current state. Then the command-enabler function should call the Enable() member function of the TCommandEnabler parameter with a value of TRUE to enable the command or a value of FALSE to disable the command.
By the way, you don't need to create the TCommandEnabler object that your command-enabler function uses for menu commands. OWL creates the TCommandEnabler objects for menus and toolbar buttons for you. For more information about TCommandEnabler objects, see the accompanying article, Where do TCommandEnabler objects come from? .
You'll add command-enabler functions to event-handling classes you define as part of your application. Typically, you'll find command-enabler functions in a class you've derived from TApplication or TFrameWindow, but you can add them to any class that derives from the TEventHandler class.
For any TEventHandler-derived class, you need to create a response table to allow OWL to call the class's member functions in response to specific Windows messages or commands. (If you're unfamiliar with OWL's response tables, see Understanding the Response Tables in ObjectWindows )
In the response table for a class that contains a command-enabler function, you'll add the name of the command-enabler function by using the EV_COMMAND_ENABLE macro. This macro associates a given command-enabler function with a specific command ID (the command constant you assign to a specific menu item when you define the menu).
If you need to enable or disable two or more commands based on the same set of circumstances, you can map both commands to the same command-enabler function. Simply add another EV_COMMAND_ENABLE macro for each command ID you want to enable or disable with that command enabler function.
That's all there is to enabling and disabling commands
in OWL 2.0. Now, let's create an example application that
enables and disables menu commands.
![]()
Listing A: ENABLER.CPP
#include "owlpch.h"
#include <owl\checkbox.h>

class TEnablerApp : public TApplication
{
  public:
   TEnablerApp(){ cmdFlag = FALSE;}
   ~TEnablerApp() {};

   void InitMainWindow()
   { TFrameWindow* frame =
       new TFrameWindow(0, "Command Enabler");
     frame->AssignMenu(100);
     SetMainWindow(frame); }

   void EvMenu1(){ cmdFlag = TRUE; }

   void EvMenu2(){ cmdFlag = FALSE; }

   void EvMenu1Enable(TCommandEnabler& ce)
   { if(cmdFlag)
       ce.Enable(FALSE);
     else
       ce.Enable(TRUE); }

   void EvMenu2Enable(TCommandEnabler& ce)
   { if(cmdFlag)
       ce.Enable(TRUE);
     else
       ce.Enable(FALSE); }

  protected:
    BOOL cmdFlag;

  DECLARE_RESPONSE_TABLE(TEnablerApp);
};

DEFINE_RESPONSE_TABLE1(TEnablerApp,TApplication)
  EV_COMMAND(101,EvMenu1),
  EV_COMMAND(102,EvMenu2),
  EV_COMMAND_ENABLE(101,EvMenu1Enable),
  EV_COMMAND_ENABLE(102,EvMenu2Enable),
END_RESPONSE_TABLE;

int
OwlMain(int, char**)
{
  return TEnablerApp().Run();
}
![]()
This application creates two command functionsEvMenu1() and EvMenu2()and two command-enabler functionsEvMenu1Enable() and EvMenu2Enable(). The command functions toggle the TEnablerApp data member cmdFlag between the values TRUE and FALSE.
The command-enabler functions examine the state of the cmdFlag data member. Depending on the cmdFlag data member's value, each command-enabler function calls the Enable() member function of its TCommandEnabler parameter (ce) with the appropriate stateTRUE or FALSE.
The DECLARE_RESPONSE_TABLE macro at the end of the TEnablerApp class definition creates the response table for all objects of this class. Then, the EV_COMMAND macros add the command functions to the response table, and the EV_COMMAND_ENABLE macros add the command-enabler functions.
To save the code in this file, choose Save from the File menu. If you want to close the editor window, double-click on its System menu icon.
Next, use the right mouse button to click on enabler [.rc] in the Project window, then choose Text Edit from the View submenu of the pop-up menu. When the editor window for the ENABLER.RC file appears, enter the resource definition from Listing B.
![]()
Listing B: ENABLER.RC
100 MENU
{
 POPUP "Command"
 {
  MENUITEM "Item 1", 101
  MENUITEM "Item 2", 102
 }
}
![]()
To save this resource definition file, choose Save from the File menu. If you want to close this window, double-click on its System menu icon.
Finally, double-click on enabler [.def] in the Project window. When the editor window for ENABLER.DEF appears, enter the code from Listing C.
![]()
Listing C: ENABLER.DEF
NAME          ENABLER
DESCRIPTION   'Command Enabler Application'
EXETYPE       WINDOWS
CODE          PRELOAD MOVEABLE
DATA          PRELOAD MOVEABLE MULTIPLE
HEAPSIZE      1024
STACKSIZE     5120
![]()
To save this module definition file, choose Save from the File menu. Now you're ready to compile and test the ENABLER.EXE application.
To automatically run the application after the compiler finishes building the EXE file, double-click on enabler [.exe] in the Project window. When the application runs, click on the Command menu.
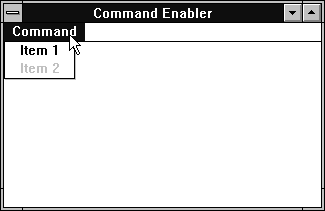
As Figure C shows, only the Item 1 command is available from the Command menu. Now, choose Item 1 from the Command menu to execute the EvMenu1() function.

Figure C - When the ENABLER.EXE application starts, the first menu item is the only command available.
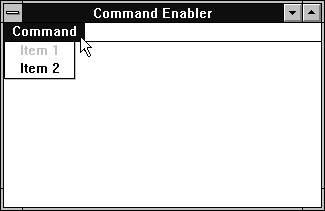
Click on the Command menu again. This time, notice that the Item 1 command is no longer available, but the Item 2 command is now active, as shown in Figure D.
Choose Item 2 from the Command menu to execute the EvMenu2()
function. Click on the Command menu once more to confirm that
the Item 1 command is again available.

Figure D - When you choose the Item 1 command, the application disables the Item 1 command and enables the Item 2 command.
To close the ENABLER.EXE application and return to the IDE, double-click
on its System menu icon. When the IDE's main window appears,
you can close the IDE by double-clicking on its System menu icon.
Enabling and disabling menu commands allows the user to know which
commands are appropriate for different contexts. By implementing
the command-enabler strategy that OWL 2.0 supports, you can add
this functionality easily.